Tuesday, November 16, 2010

Giving Thanks

If you have read my blog for any length of time, you know that I'm all about making traditions and memories for my littles.  This year we've started a new one, inspired by my friend Linda, who's children are now grown but still love it.

We made ourselves a thanksgiving tree.


The boys and I shredded and crumpled brown paper bags and packaging paper and taped them to the wall to create a tree.  Then we cut leaves out of scrapbook paper, making sure they were big enough for people to write on.


I made a little pocket on the wall next to the tree and filled it with our leaves and a pen.  Anytime anyone thinks of something they are thankful for they can write it on a leaf and stick the leaf on the branch.  Our goal is to get so many leaves that we have to "rake" them up at the end of fall! 


Be warned!  Anyone who visits my house will be asked to fill out a leaf, even the Fed-Ex guy!


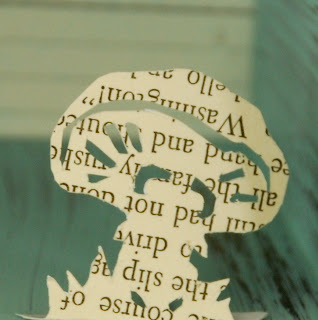
I also made some grass and a mushroom and few birds to embellish our tree, because that's just how I am. ;)


I finished another paper wreath with waxed fall leaves, this time for Rena.  I LOVE how it came out!  Makes me want to redo mine!


What traditions does your family have for Thanksgiving?

Saturday, September 18, 2010

Paper Cuts

We're meant to be scurrying around the house getting ready for a party today but instead I've still got a nasty head cold and Justin doesn't know what he did to his back.  We cancelled postponed the party until further notice.  Poo.

Let's find that silver lining shall we?  Well, there's the fact that my congested head is giving me the simulated feel of some illegal street drug.  I'm floating about three inches out of my body I think and the music on my ipod is sounding far away and dreamy.  Not a bad feeling really.  Oh dear, that didn't sound very good.

Moving on, there is also the fruit of three or so days spent on the couch.  All who know me know that I can't just sit and stew in my own juices.  I can't even just watch a movie.  I have to be doing something.  This has lead to my addiction with sunflower seeds and reading.  It keeps my hands and mouth busy.  I have also gained a good deal of weight on this pastime.

To avoid an all out gorge fest I brought out my paper cutting supplies and made this project that's been in my head since Anthropologie came out with their December catalog last year which featured one of my favorite pastimes.  I wish I'd kept that catalog it was pure delight to look through!


The shadow boxes were hideous dark 70's Mediterranean affairs with brassy gold accents.  But I saw the potential in them.  I used my favorite Basic Grey Periphery paper that I haven't been able to bring myself to use for scrapbooking too.  Now it's out where I can see it everyday and swoon over it's beauty.

By yesterday evening I was surrounded by the confetti of several pieces of bristol paper and an old book (don't worry, I read the book first, it wasn't very good.  I bought it because I liked the title and front cover).

I folded a strip of my favorite paper to look like a curtain.

The row of houses is cut out of the dust cover of that old book. It had a big rip in it and was bound for the trash!

I paste the book paper together with bristol paper and glue tooth picks to the back of my trees to help them stand up.

I had so much fun with these shadow boxes that I'm itching to do more.  I have three more scalloped ones from a yard sale eons ago.  I painted them and fitted them with paper backdrops and away I'll go!


I also found the time inspiring for beginning my annual parade of paper "putz" houses.  These little cottages haven't been painted or glittered yet and are still awaiting their berry topped trees.  I design them based on vintage putz houses from the 30's but make sure that each one I craft is unique unto itself.  I don't use templates or pre-cut anything.  I draft out each one on bristol paper.


I started crafting putz houses in 2001 long before Martha Stewart introduced them to the world and sent the ebay auction prices of the vintage ones shooting through the roof!  That same year I began selling my reproduction houses on ebay and did a good little business but found them too time consuming to do all year round.  I haven't sold any in a few years, just made them as gifts and added to my own feather tree display.


For more on vintage putz houses go here.

This year I'm going to put some up in my etsy shop and see how they do.

Well, I'm seriously floating now with Coldplay on in the background..so, perhaps I ought to go make myself a cup of tea and come back down to earth...

Ta!  Oh and check out Life Made Lovely Monday at blessed little nest!

Friday, July 23, 2010

Darling Starling Potholder Tutorial


I've been sewing sewing sewing!  I made myself the cutest new dress.  I have a passion for vintage dresses from the fifties.  Sadly, they either cost a fortune, are disintegrating or impossible to find in my size.

I started snapping up vintage patterns, again hard to find in my size when you consider that a size 12 was a 32 bust, 23 waist!  I've also discovered some vintage pattern reproductions.  I'm having a blast.  I've got to get the husband to take pictures of me modelling a couple and put them up here!

Today, I made good on my promise and created the pattern for my bird potholder, which is available in this post.  Just save the images to your computer.  Sorry about the quality of the images.  I created them in Photoshop and then realized I had to take them down to jpeg files to work for you all.

I refined the shape and style a little since I am no longer free handing it! ( Sorry Greta!  Now you've got the original guinea pig potholder.  But it's one-of-a-kind!)

Next I made myself a potholder and photographed it step-by-step so you can now make your own should you chose!

It's a fun little project, fairly simple, taking me about a half hour for potholder #2, now that I know what I'm doing and have a pattern!

Without further ado, the tutorial:

Betsi's Darling Starling Potholder
tutorial and pattern by: Betsi Jenkins


Items needed:

  • cotton fabric

  • matching thread

  • extra wide double-fold bias tape

  • felt

  • fusible interfacing

  • poly fill
Directions:

Print out pattern.  Size adjustment may be necessary.  Each image should fill a standard 8"x11.5" sheet of computer paper. 


Trim extra paper from patterns leaving a border around each image.

Fold fabric once in half, right side out.

Pin underside portion (B) with fold line flush with fabric fold.  Pin top portion (A 1,2) so that two identical birds will be cut at once.


Cut out patterns.

Remove underside (B) pattern from fabric.   Fold piece of felt in half.  Pin underside pattern to felt matching fold line to fabric fold.  Cut.


Lay felt out flat.  Cut fusible interfacing to size of felt.  Iron interfacing to felt, following directions on interfacing. 

Lay felt out flat, interfacing side up.  Lay underside portion (B) fabric flat on top, right side up.  Sew felt to underside fabric 1/4" from edge all around.


Lay one side of top portion (A1) right side down.


Fold underside (B) in half,  felt on the outside, fabric on the inside.  Line up on top portion (A1) with underside fold towards top of bird's "back".

Fold open underside (B).  Pin along bottom semi-circle of bird (A1).

Fold underside (B) flush again.

Line up second side of top portion (A2) right side up onto underside semi-circle.   Pin half of underside (B) to top portion (A2) at semi-circle.  Stitch along pinned sections to create a "pocket".


Sew head and tail of bird top portions (A1,2) together, leaving "back" seam unsewn.


Sew on bias tape onto lower semi-circle of one side of pocket mouth.  Turn over.

Sew on bias tape from beak to tail on opposite side of bird/pocket, tucking in raw edges from reverse side.


Stuff poly fill into back of bird, lightly filling head, body and tail of bird on both sides.  Pin back seam closed.  Stitch together.


Pin bias tape to back from beak to tail, folding under ends.  Sew.


And your done!


I'd love to see your finished products if you choose to try this project out.  Leave me any questions you have in the comments!

Enjoy!

Wednesday, June 16, 2010

Terrific Bacon Potato Salad

I don't want my kiddos to remember me as "the mom who always looked great and had it all together" or "the mom who was on top of the messes and ironed every piece of laundry".  I want them to remember me as the mommy who colored with them.  The mommy who made homemade food and invited their friends over for dinner on a whim.  Who could make impromptu parties out of watermelon and lemonade.  I can be that mommy.  That's not too tall an order.  It's being me.  If I can set aside the expectations I have of being those other moms it will be ok.


Betsi's Terrific Bacon Potato Salad

  • 7 large red potatoes (12 small red potatoes)

  • 1 tsp. salt

  • 1/2 lb bacon

  • 1/4 c. fresh chopped parsley

  • 1/4 c. finely diced shallots

  • 1 medium red bell pepper, finely diced

  • 2 tbsp. white wine vinegar

  • 1 c. mayonnaise

  • 1 tsp. oregano

  • salt and fresh cracked pepper to taste
     Clean and slice potatoes into 1/8" thick segments.  If using large potatoes, I like to cut these in half.  Put in stock pot and cover with cold water.  Bring to boil and boil for 15 minutes.  Remove immediately and drain in strainer.  Set aside to cool.

     Fry bacon in skillet until crisp but still tender.  Save 1 tbsp. of bacon grease aside.  Saute parsley, shallots and bell pepper in remaining grease in skillet until tender.

     Pour reserved, hot bacon grease into small bowl with vinegar.  It's very important that you use white wine vinegar, instead of just white vinegar.  The taste is so different in my opinion.  Add mayo and oregano and mix together.

     In a large bowl combine potatoes with shallot and pepper mix.  Crumble bacon over mix.  Cover with mayo mix and stir together adding salt to taste and fresh cracked pepper if desired.

Enjoy!

Tuesday, June 1, 2010

When life gives you lemons..

Oh what a weekend!  I love long weekends with all my family home and barbecues afoot and friends coming to stay.  Our long weekend began on Friday with Isaac off from school and Justin off from work. We even had a failed camping attempt planned.  Unfortunately, autism had a different idea so the trip was postponed but other fun things occurred instead.

Last night I surveyed the damage.  It's not too bad.  The house is generally clean except for a generous sprinkling of toys and books.  But the kitchen sink.  The recipient of a couple days of merriment and the inevitable "every one's home" effect.  It's moments like these that it really hits home that I live with four men.

I sighed, not exactly excited about beginning this monumental task at ten at night.  House Hunters International was on in the background and I made a decision.  My brain still needed a vacation from our vacation weekend.


I needed lemonade.  Fresh lemonade.  I grabbed about fourteen lemons, organic naturally, sugar, my jadite juicer and my special, specifically for homemade lemonade, pitcher.


(Forgive my claw like hands here)

It's very important when making lemonade to use the right ingredients in the right proportions.  I'd love to give you a recipe but it's all by taste really.  I squeeze about two cups of lemon juice and add in about two or more cups of organic sugar (this has to be stirred longer as it takes longer to dissolve) and fill the rest of the pitcher with water.


And no other lemonade will ever taste this good.  Not even the Hot Dog on a Stick stuff.

So the dishes still await.


But so does the lemonade.